How to protect the WordPress debug log

WordPress includes a built-in debugging system that can help identify problems with plugins, themes and custom code.
When debug logging is enabled using the default settings, WordPress typically writes PHP errors, warnings and notices to:
wp-content/debug.log
The information in this file can be extremely useful when troubleshooting a website. Unfortunately, the default location may also make the log publicly accessible if your web server allows direct access to it.
A debug log can contain detailed information about your website, including server file paths, plugin and theme names, PHP warnings and other information that should not normally be exposed to visitors.
In this guide, we’ll look at how to use the WordPress debug log more safely.
Why is the WordPress debug log a security risk?
A typical WordPress debug log entry might look something like this:
[14-Feb-2026 13:50:13 UTC] PHP Deprecated: realpath(): Passing null to parameter #1 ($path) of type string is deprecated in /home/example/webapps/site/wp-content/plugins/example-plugin/includes/file.php on line 40
The warning itself may not represent a security problem.
However, the message reveals information about the website’s server environment, including:
- the server’s filesystem structure
- the location of the WordPress installation
- installed plugins or themes
- PHP errors, warnings and deprecated code
Depending on the website and the code generating the log entries, additional information may also be written to the file.
The bigger problem is that the default debug log has a predictable location:
/wp-content/debug.log
If the web server permits access to .log files, someone may be able to request the file directly:
https://example.com/wp-content/debug.log
Automated scanners can also check websites for common files such as this.
For that reason, debug logs should not be left publicly accessible.
1. Disable WordPress debugging when you don’t need it
The safest option for a production website is to disable WordPress debugging when you are not actively troubleshooting a problem.
Open your site’s wp-config.php file and make sure WP_DEBUG is set to false:
define( 'WP_DEBUG', false );
WordPress recommends using its debugging tools primarily on development and staging installations rather than live websites.
After disabling debugging, check for an existing:
wp-content/debug.log
If the file is no longer required, delete it.
Disabling WP_DEBUG does not automatically remove an existing debug log, so an old file could remain publicly accessible even though WordPress is no longer writing new entries to it.
2. Use a staging site whenever possible
If you are troubleshooting a plugin, theme or code change, a staging or development environment is usually a better place to enable debugging.
This allows you to:
- investigate errors without affecting visitors
- enable more detailed debugging
- test changes safely
- keep debugging information away from your production website
Once the problem is resolved, apply or deploy the fix to the production website rather than leaving debugging enabled indefinitely.
For many routine WordPress problems, this is the preferred approach.
3. Move the debug log outside the public web root
Sometimes you need to troubleshoot a problem that occurs only on the live website.
In that situation, WordPress allows you to specify a custom location for the debug log.
Instead of:
define( 'WP_DEBUG_LOG', true );
you can provide a full filesystem path:
define( 'WP_DEBUG_LOG', '/home/example/logs/wp-errors.log' );
WordPress will then write the debugging information to that location rather than the default wp-content/debug.log file. WordPress officially supports using a custom file path for WP_DEBUG_LOG.
Whenever possible, choose a location outside the publicly accessible directory for your website.
For example, if your website is stored in:
/home/example/public_html/
you might store the log somewhere such as:
/home/example/logs/wp-errors.log
rather than anywhere inside public_html.
The exact paths available to you depend on your hosting provider.
WordPress also recommends storing error logs above the site’s public root directory when possible.
A safer configuration for temporary debugging
If you must enable debugging on a live site, a configuration similar to the following is preferable:
define( 'WP_DEBUG', true );
define( 'WP_DEBUG_LOG', '/home/example/logs/wp-errors.log' );
define( 'WP_DEBUG_DISPLAY', false );
@ini_set( 'display_errors', 0 );
Replace the example log path with a valid location on your own server.
WP_DEBUG_DISPLAY prevents WordPress debug messages from being inserted into pages that visitors can see. WordPress recommends using this setting when errors are being written to a log instead.
Add these settings in wp-config.php before:
/* That's all, stop editing! Happy publishing. */
When you have finished troubleshooting, disable debugging and remove the log if you no longer need it.
What if you cannot store the log outside the web root?
Some shared hosting accounts may not allow WordPress to write files outside the website’s public directory.
In that case, you still have a few options.
You can use a custom filename rather than the predictable debug.log name:
define( 'WP_DEBUG_LOG', '/home/example/public_html/wp-content/wp-errors-a8f42c19.log' );
A difficult-to-guess filename reduces the chance of casual discovery, but it should not be treated as equivalent to preventing public access.
A better solution is to configure your web server to deny HTTP access to the log file.
For an Apache website, for example, you can protect a specific log file in .htaccess:
<Files "wp-errors-a8f42c19.log">
    Require all denied
</Files>
You would still be able to read the file using your hosting control panel, SFTP or SSH, but attempts to request it through a web browser should be denied.
Web-server configurations vary, so contact your hosting provider if you are unsure how to protect the log file.
Verify that the debug log is protected
Don’t assume that changing the configuration worked.
If you previously used the default WordPress debug log, try requesting:
https://example.com/wp-content/debug.log
The file should not display.
If you have stored the log outside the site’s public web directory, there should be no public URL that maps to the file at all.
If you protected a log using your web-server configuration, requesting its URL should return an error such as:
403 Forbidden
Also check that WordPress is actually writing debugging information to the new location before relying on it during troubleshooting.
Don’t display PHP errors to visitors
Protecting the debug log is only part of the job.
PHP errors and warnings can also reveal detailed server information when they are displayed directly in a web page.
When temporarily debugging a live WordPress site, use:
define( 'WP_DEBUG_DISPLAY', false );
@ini_set( 'display_errors', 0 );
and send the errors to your protected log instead.
The WordPress documentation specifically recommends disabling error display on production websites.
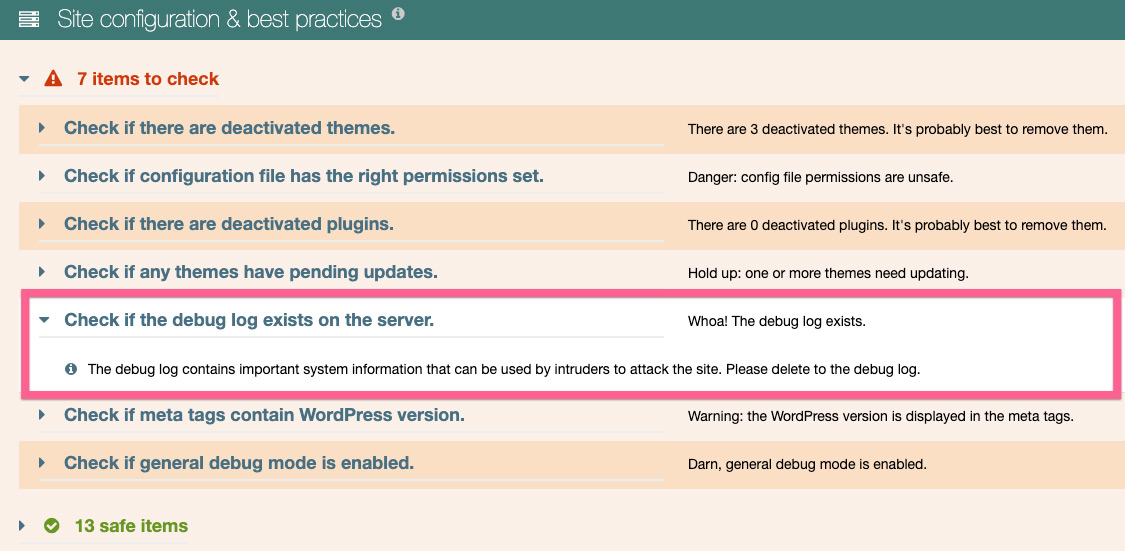
Watchful can check for exposed WordPress debug logs
If you manage many WordPress websites, checking each site manually for exposed debug logs is easy to overlook.
The Watchful Vulnerability Scanner includes site-configuration and security best-practice checks and identifies issues that may require attention.
When a WordPress debug log is detected, you can investigate the site and determine whether debugging should be disabled, the existing log should be deleted, or the log should be moved to a safer location.
This is especially useful when managing multiple websites where debugging may have been temporarily enabled during troubleshooting and never disabled afterward.
Use debugging temporarily
WordPress debugging is an extremely useful troubleshooting tool. The problem isn’t the debug log itself — it’s leaving sensitive diagnostic information somewhere that anyone can retrieve it.
For production websites, the safest approach is:
- Use a staging environment whenever possible.
- Enable debugging only when you need it.
- Keep debug logs outside the public web root.
- Disable on-screen error display.
- Delete old debug logs when troubleshooting is complete.
- Disable
WP_DEBUGwhen it is no longer required.
The official WordPress documentation contains additional information about WP_DEBUG, WP_DEBUG_LOG, WP_DEBUG_DISPLAY and the other debugging tools available in WordPress.



0 Comments